
Tools:
Handsaw | Pencil | Ruler | Hammer | Nails | Wood Glue | Drill
Advisory:
Be careful with the tools and nails as they have sharp ends! This is not intended for children.
Wear protective gear such as safety glasses and a mask.
Covid 19: Please be safe while shopping for the materials and follow the mandated safety guidelines.

1: Box Size & Base
Determine the dimensions of your box. Then visit a local hardware store and find the plywood sheet section. Larger stores will cut the piece for you! Plywood, Particle Board, or MDF would be ok. I used plywood. Standard sizes are 1’x2’, 2’x4’, 4’x8’
The Box size you see in my video is 2’x6’
Note: 3/4” thick plywood would be best as it has lot of surface area to glue / nail into. There are different grades of plywood, high end furniture grade to low end cheaper ones. I recommend not going with the cheapest one as it has a bumpy surface and a porous interior.

2: Side Material & Length
Find a solid wood piece like shown in the diagram. Hardware stores usually have select pines or other species of lumber in standard lengths of 6’, 8’ and so on. Try to find a straight one. You can place it on the floor to see if it is warped. I recommend the height to be minimum of 1.5”. Thickness can vary from 1/4” to 1”. Make sure the wood you buy is few inches longer than the base dimension you’ve decided.
Short Sides should match the width of the plywood like you see in this diagram. For Long Side see the next step.

3: Long Side Length
To determine the length of the Long Side, we need to add the thickness of the 2 shorter sides in addition to the length of the plywood base.
A = Side Thickness
B = Plywood Base Length
A + B + A = Long Side Length
See the next step for instructions on how to cut.

4: Mark the Cut Line
If you don’t have a 90 degree ruler. You could fold the a piece of paper and trace it to get a rough perpendicular line. Use the ruler to measure the distance.

5: Cut the Wood
Cut the wood using the hand saw following the pencil mark.
Note: While using the American Saw you “push” to cut. If you are using a Japanese Saw, you “pull” to cut.
Caution: Please be careful while using the saw as it has sharp edges!

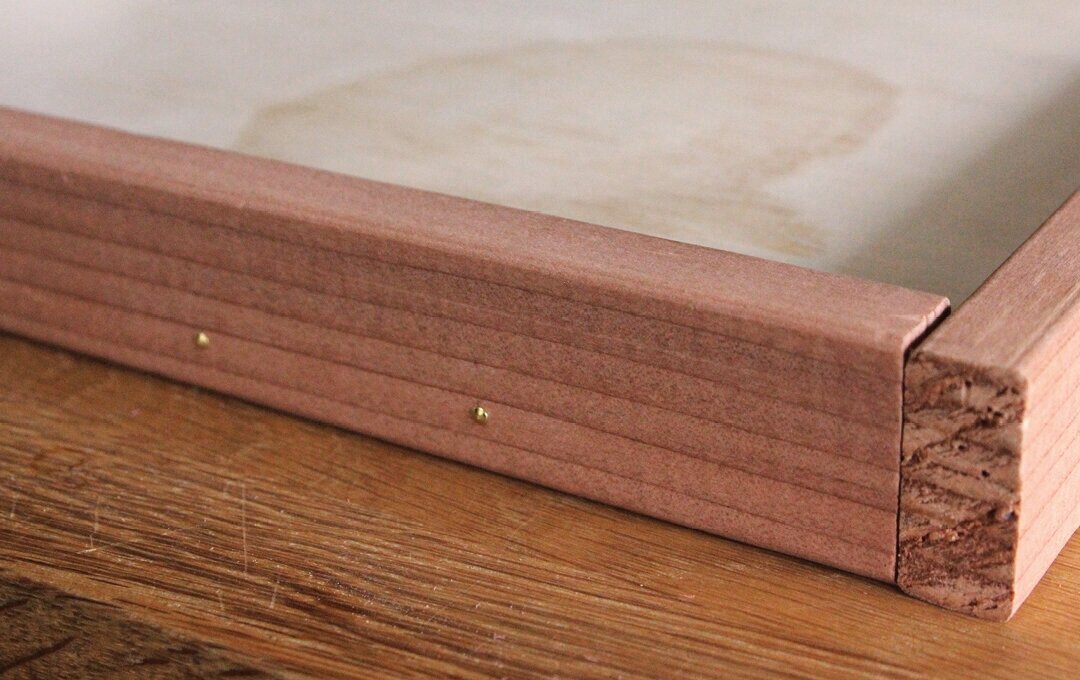
6: Hole Locations
The nails should hit the middle of 3/4” thick base. The “+” pencil marking on the wood in the photo indicates 3/8” from the bottom edge.
Note: It is most satisfying to see an even nail distribution through out the length of the box. You don’t have to follow this, but I mark them at every 2”. You can start from both ends and meet in the middle.

7: Drill Bit & Nails
A tight fit is better than a loose fit. Find a drill bit that is slightly smaller in size to the nail width. Make sure that the nail head is bigger than the drill bit. Also the length of the nail must be longer than the thickness of the side edges. You will see why in step 9.
Note: This nail has a gold finish to it but you can use any nails of your choice. They are usually available in black, white, silver etc.

8: Drill Holes
Once you are done drilling the holes, you can erase the pencil marks after. Try to drill as straight down as you can through the material.
Note: Make sure not to drill into your work surface. You can avoid this by putting another piece of scrap wood below.
Note: Usually drilling holes is not necessary to nail. You can just nail without the holes to get a similar result. However, using drill holes makes the gluing step easier.

9: Nail Connection
As mentioned in step 7, this is how much the nails should stick out from the side piece. It could be a little more.

10: Glue
Using wood glue will make sure that there will be no gaps / openings. This will prevent small sand particles from falling through any cracks.

11. Assemble
During assembly, the glue will drip on your work surface! In order to avoid a mess afterwards, you can spread a few news papers or tarp for protection.
Note: Make sure that work surface is flat and both the base and the side wood piece are flush to the surface.

12. Nailing to the Base
You can bring the box to the edge of the work surface and hammer the nails in.
Note: Glue excess might appear on the inner edge where the base meets the sides. You can take a wet paper towel to remove it. Once the glue dries, it will be there forever so be careful!
13. Drying
You must wait at least 20 min until you can move the box. It is best to wait 24 hours before putting any force on the box.
Congratulations! Your box is now ready.
You are now ready to add Rocks and Sand to your new Zen Garden!
Woodworking Disclaimer:
Wood working is inherently dangerous. Anyone using any tools is personally responsible for learning the proper techniques involved, and he or she assumes all risks and accepts complete responsibility for any and all damages and injury of any kind, including death. Before using any tools with which you are unfamiliar, seek instruction by a qualified person well versed in their use and follow appropriate safety techniques.
It remains up to you to make sure what you're doing is safe. Wood working is very fulfilling but it is not worth the cost of getting hurt. Please keep personal safety and the safety of people around you foremost in your mind.
Thank you!

Rocks & Sand

Rakes